在使用带有隐藏层的三层神经网络中,Tensorflow对MNIST数据集识别大约达到了96%的准确率,这样的效果是比较差的
在普通神经网络中,对于每一个28*28图像,都将其展开成为了1*784的向量,权重向量Wi的含义就是对于每一个像素点,当这个点为白色时,图中数字有多么可能是i。这样一来,图像的二维逻辑信息全部丢失,对准确率造成了影响。
卷积神经网络利用卷积核和卷积运算实现了权值共享和稀疏连接,在减少运算量的情况下保留了图片的二维逻辑信息。
对于卷积运算的作用,用下面一个实例来解释:
import numpy as np
import tensorflow as tf
from tensorflow.contrib.learn.python.learn.datasets.mnist import read_data_sets
import matplotlib.pyplot as plt

mnist = read_data_sets("MNIST/", one_hot=True)

def show_image(image_array):
    edg = 1
    for i in image_array.shape:
        edg *= i
    edg = np.sqrt(edg)
    if(np.floor(edg) != edg):
        return "Cannot Show Image, shape:", image_array.shape
    _im = image_array.reshape(int(edg),int(edg))
    fig = plt.figure()
    plt.imshow(_im ,cmap = 'gray')
    plt.show()

fitter_1 = np.array([    #水平过滤器卷积核
     [1, 1, 1],
     [0, 0, 0],
     [-1, -1, -1]
]).reshape([3, 3, 1, 1])
fitter_2 = np.array([    #垂直过滤器卷积核
     [1, 0, -1],
     [1, 0, -1],
     [1, 0, -1]
]).reshape([3, 3, 1, 1])

sess = tf.Session()

batch_xs, batch_ys = mnist.train.next_batch(1)
print(batch_ys[0])
show_image(batch_xs[0])
X = tf.reshape(batch_xs[0], [-1,28,28,1])
#卷积图像
res = sess.run(tf.nn.conv2d(X, fitter_1, strides=[1, 1, 1, 1], padding='SAME'))
res = (res + np.abs(res)) / 2
show_image(res.reshape(784))
res = sess.run(tf.nn.conv2d(X, fitter_2, strides=[1, 1, 1, 1], padding='SAME'))
res = (res + np.abs(res)) / 2
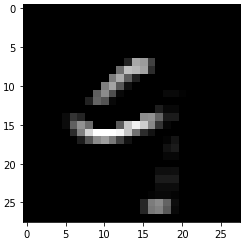
show_image(res.reshape(784))这段程序的作用是定义两个卷积核,第一个卷积核的第一行全为1,第二行全为0,第三行全为-1,这样一来,对于图像矩阵而言,执行卷积运算的时候会使得有横线的部分数值更大,而竖线的部分由于上下抵消,数值较小。这样就能过滤出图像所有的横线。
对于第二个卷积核,道理和第一个一样,可以过滤出图像的竖线。
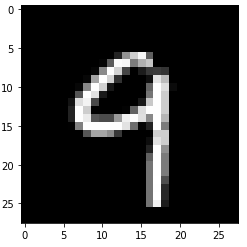
运行一下发现:
原图:
fitter 1 卷积后:
fitter 2 卷积后:
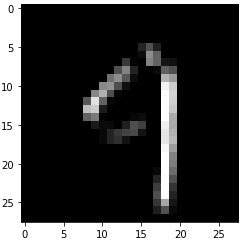
清晰的发现,图像的横竖部分全部被过滤出来了。这样的图给神经网络带来的影响是:对于一个图像,如果图像右侧出现一个竖线,上面有两个横线,两个横线中间有一个微弱的竖线,这样的图像就是“9”。
池化运算是卷积神经网络很重要的运算,它可以在保留图像逻辑信息的情况下压缩了图像。继续在上面的程序上举例子:
batch_xs, batch_ys = mnist.train.next_batch(1)
show_image(batch_xs[0])
X = tf.reshape(batch_xs[0], [-1,28,28,1])
img = tf.nn.max_pool(X, ksize=[1, 2, 2, 1],strides=[1, 2, 2, 1], padding='SAME')
show_image(sess.run(img))
这个程序执行了一次池化运算,得到的结果:
原图:
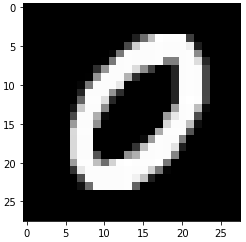
池化后:
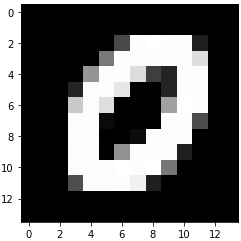
可见图像由28*28缩小到了14*14,但是图像总体特征没有发生变化,虽然高糊,但是还能认出这是个0。
根据这些理论基础,构建神经网络:
import gzip
import os
import tempfile
import numpy as np
from six.moves import urllib
from six.moves import xrange  # pylint: disable=redefined-builtin
import tensorflow as tf
from tensorflow.contrib.learn.python.learn.datasets.mnist import read_data_sets
import matplotlib.pyplot as plt
mnist = read_data_sets("MNIST/", one_hot=True)

def show_image(image_array):  #显示图像
    edg = 1
    for i in image_array.shape:
        edg *= i
    edg = np.sqrt(edg)
    if(np.floor(edg) != edg):
        return "Cannot Show Image, shape:", image_array.shape
    _im = image_array.reshape(int(edg),int(edg))
    fig = plt.figure()
    plt.imshow(_im ,cmap = 'gray')
    plt.show()

X = tf.placeholder(tf.float32, [None, 784])
Y = tf.placeholder(tf.float32, [None, 10])
#第一个卷积层
x_image = tf.reshape(X, [-1, 28, 28, 1])  #第一层输入
k1 = tf.Variable(tf.truncated_normal([5, 5, 1, 32], stddev=0.1))  #第一层卷积核,5*5,输入1个通道,输出32个特征图
b1 = tf.Variable(tf.constant(0.1, shape=[32]))  #第一层偏置项
conv1 = tf.nn.conv2d(x_image, k1, strides=[1, 1, 1, 1], padding='SAME')+b1  #执行卷积运算
y1 = tf.nn.relu(conv1)  #激活函数
y1 = tf.nn.max_pool(y1, ksize=[1, 2, 2, 1],strides=[1, 2, 2, 1], padding='SAME')  #最大池化,第一层输出
#第二个卷积层
#y1为第二层输入
k2 = tf.Variable(tf.truncated_normal([5, 5, 32, 64], stddev=0.1))  #第二层卷积核,5*5,输入32个通道,输出64个特征图
b2 = tf.Variable(tf.constant(0.1, shape=[64]))
conv2 = tf.nn.conv2d(y1, k2, strides=[1, 1, 1, 1], padding='SAME')+b2  #执行卷积运算
y2 = tf.nn.relu(conv2)  #激活函数
y2 = tf.nn.max_pool(y2, ksize=[1, 2, 2, 1],strides=[1, 2, 2, 1], padding='SAME')  #最大池化,第二层输出
#第三个全连接层
x3 = tf.reshape(y2, [-1, 7*7*64])  #输入张成[None, 7*7*64]维度向量(拉伸成1维的)
w3 = tf.Variable(tf.truncated_normal([7*7*64, 1024], stddev=0.1))  #权重
b3 = tf.Variable(tf.constant(0.1, shape=[1024]))
y3 = tf.nn.relu(tf.matmul(x3, w3) + b3)
#dropout,防止过拟合
keep_prob = tf.placeholder("float")
y3 = tf.nn.dropout(y3, keep_prob)
w4 = tf.Variable(tf.truncated_normal([1024, 10], stddev=0.1))
b4 = tf.Variable(tf.constant(0.1, shape=[10]))
y_ = tf.nn.softmax(tf.matmul(y3, w4)+b4)
#损失函数
loss = -tf.reduce_sum(Y*tf.log(y_))
train_step = tf.train.AdamOptimizer(1e-4).minimize(loss)

def test(idx): #显示测试集下标为idx的图像,并打印神经网络对其预测结果
    show_image(mnist.test.images[idx])
    print(sess.run(tf.argmax(y_, 1), feed_dict={X: [mnist.test.images[idx]], keep_prob:1})[0])

#运行
sess = tf.Session()
sess.run(tf.initialize_all_variables())
for i in range(3000):
    batch_xs, batch_ys = mnist.train.next_batch(50)
    sess.run(train_step, feed_dict={ X:batch_xs, Y:batch_ys, keep_prob:0.5 })
    if i % 100 == 0:
        print("loss:", sess.run(loss, feed_dict={ X:batch_xs, Y:batch_ys, keep_prob:1 }))

#求准确度
correct_prediction = tf.equal(tf.argmax(y_,1), tf.argmax(Y,1))
accuracy = tf.reduce_mean(tf.cast(correct_prediction, "float"))
accu = 0  #垃圾RPi内存太小,直接测试会boom,拆10组取平均
for i in range(0, 10000, 1000):
    test_acc=sess.run(accuracy, feed_dict={X: mnist.test.images[i:i+1000], Y: mnist.test.labels[i:i+1000], keep_prob: 1.0})
    print("test accuracy for %d~%d \t"%(i, i+1000), test_acc)
    accu = accu + test_acc
print("accuracy \t", accu / 10)
这里仅仅训练了3000次(在RPi上跑的,性能太差,没耐心了,多迭代几次结果会更好),准确率就达到了98.05%,比普通BP神经网络效果好了很多
这个程序在第一层训练除了32个卷积核,每一个卷积核都是一个“过滤器”,可以过滤出图像的某些特征,神经网络在执行预测时,会用这些过滤器对图像进行操作,寻找是否存在相应特征。要想看到这些卷积核对图像执行了哪些操作,可以执行:
for i in range(32):
    show_image(sess.run(k1, feed_dict = {x:mnist.test.images[3:4]})[0].T[i].T)
部分结果:


